StratoLab
Lesson 5: Writing Data to SD Card Module
Pre-requisites
- Complete Lesson 1: Blinking Light
- Thonny Python IDE installed on your computer
- A FAT32 formatted micro SD card 32GB or less. Use How to Format SD Card on Mac, Windows, Android and Camera as a guide.
- All necessary hardware components (Raspberry Pi Pico, HW-125 SDCard module, breadboard, wires, USB cable, computer)
Objectives
- Use breadboard to wire SD Card module to Raspberry Pi Pico
- Install a MicroPython driver to the Raspberry Pi Pico
- Write test data to CSV file stored on the SD Card
- Read test data stored on the SD Card
- Delete test data from SD Card
Results
- Familiarity with wiring a breadboard
- Understanding of basic MicroPython code
- Learn the importance of MicroPython drivers and how to use them
- A functioning program for storing data on an SD card connected to the Raspberry Pi Pico
Video Walk-through
In addition to the reading below, you can watch this video for guidance!
Steps
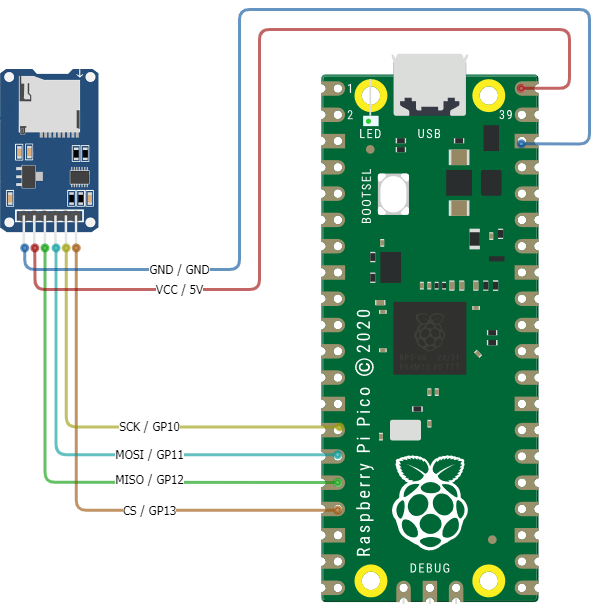
Wire the HW-125 SDCard reader to the Raspberry Pi Pico
IMPORTANT Before wiring your Pico, UNPLUG IT FROM YOUR COMPUTER. If plugged in while wiring, you risk damaging the Pico or SDCard reader.
| HW-125 Pins | Description | Pi Pico Pins |
|---|---|---|
| VCC | (Voltage Common Collector): Provides power to the HW-125. | VBUS 5v (40) |
| GND | Ground | GND (38) |
| SCK | (Serial Clock): Accepts clock pulses from the Pico to synchronize data transmission | GP10 (14) |
| MOSI | (Master Out Slave In): SPI input to microSD card module | GP11 (15) |
| MISO | (Master In Slave Out): SPI output from the microSD card module | GP12 (16) |
| CS | (Chip Select): Control pin used to select one (or set) of devices on the SPI bus | GP13 (17) |
Format the micro SD card
Format the micro SD card as FAT32. Use How to Format SD Card on Mac, Windows, Android and Camera as a guide.
Partition larger SD card to 32GB
If you do not have a 32GB card you can partition a larger card down to 32GB and it will work as well. Be cautious in using Disk Formatter because you can accidentally reformat any attached storage device to your computer. Double check you have selected the SD card you want to format.
Install SD Card MicroPython Driver
Drivers are code modules for enabling certain functionality. One such driver allows us to read data from the SD Card module. This driver is called sdcard.py and is located in the Raspberry Pi Pico /drivers/src/ location. The following steps will result in saving this driver to the Raspberry Pi Pico so the driver can be used by our Python code.
-
Download the driver called
sdcard.pylocated in the Raspberry Pi Pico /drivers/src/ location. -
Connect your Raspberry Pi Pico to your computer using the USB cable.
-
Open the Thonny IDE. Stop/Restart the backend to refresh the connection.
You should now see
Raspberry Pi Picodisplayed in the left-hand navigation of Thonny.If the “Files” window is not displaying add it from the View > Files menu.
-
If one does not already exist, create a new directory in Thonny on the Raspberry Pi Pic called
drivers.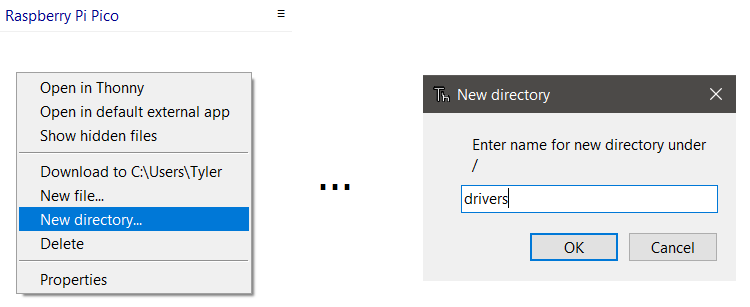
-
Using Thonny, select File then Open from the menu. Choose This Computer. Navigate to the location where you downloaded
sdcard.pyin a previous step. Select the file and click Open. -
Save the
sdcard.pyfile to the Raspberry Pi Pico. This allows our code to use the driver to perform SD card actions in MicroPython when running on the Pi Pico.Click File then Save as…. Choose Raspberry Pi Pico. Double-click the
driversfolder created in a previous step. Then save thesdcard.pyfile being sure to name itsdcard.py. -
If a file called
__init__.pydoes not already exist in the/driversfolder, create a new file in Thonny called__init__.py.Click File then New. Then click File then Save as…. Choose Raspberry Pi Pico and save this empty file to the same
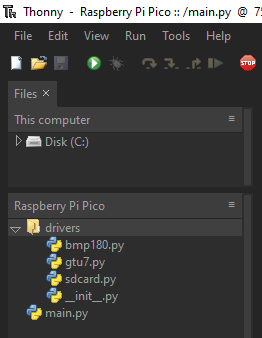
driverslocation as the previous step. Name the file__init__.py. This empty file is used by Python to indicate thedriversfolder is to be used for Python modules.Your finished folders and files should look like this:
SD Card Reader/Writer Program
The steps in this section will use the previous hardware and driver sections to allow writing to, and reading from a CSV file. The code example for this lesson is located in Lesson 5: /src/main.py.
-
Using Thonny, open the
main.pyfile in Lesson 5: /src/main.py. -
Run the script.

Output will be generated to the console in Thonny describing the actions being taken. You will also see a new directory created on the SD card called
/sdif using the example code. Within this folder is a called calleddata.csv. You may choose to download this file to your computer and open the file using a program such as Microsoft Excel to read the data in a more familiar program.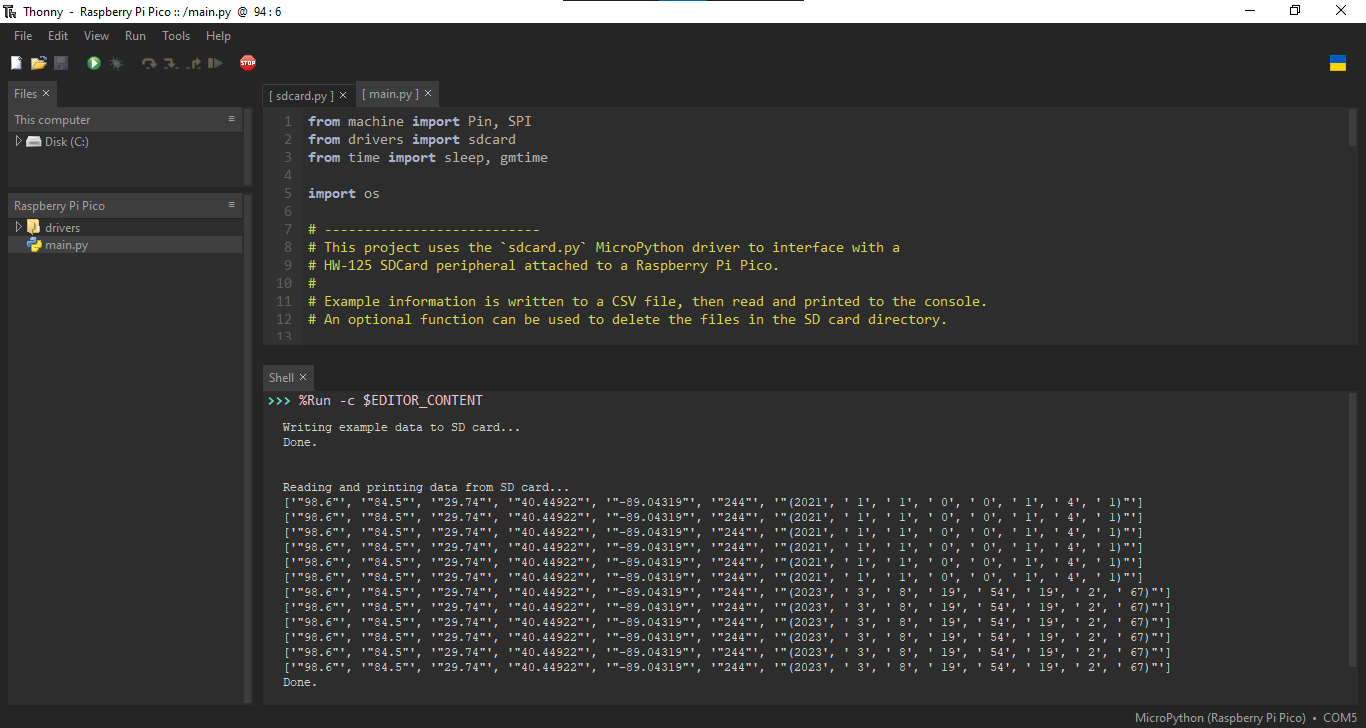
Congratulations! You have successfully completed Lesson 5.
Want more?
If you have finished with the base lesson, check out the items below.
Update the code to do any/all of the following:
- Write your own custom output to the file and change the filename
- Use a loop to write the even numbers from 0 to 100 into the file 😵
Things to think about, validate, and/or try:
- How big is the file?
- Is CSV the best output format?
- How long before we run out of space on the SD card? 🤔
Challenge
Create a function to delete contents on the SD card
A successful implementation of this code will result in the following:
- A new function called
delete_files_from_sdcard_folder - This function will take in a folder name and delete all the contents in that folder
- The function will print status information to inform the user of actions being taken
- The function may implement the use of Try Except to handle exceptions
As you think through this code, also consider previous challenges in lessons that introduce concepts of Python Functions and Python Try Except blocks for exception handling.